


How To Prevent Renovation Nightmares: 9 Key Details To Look Out For In A Renovation Contract
Renovations can be one of the most stressful parts of home ownership. No doubt you’ve heard many horror stories over the years: home buyers blindsided by unexpected costs, terrible workmanship and delays, and – in worst-case scenarios – the contractor ghosting them and vanishing with the money.
Picking the right ID/contractor is a tough job in itself but besides the usual tips on how to choose, once you’ve decided on one – getting the contract right is another way to help ease further complications down the road. Here are some points in your renovation contract that you absolutely should take note of:
Table Of Contents
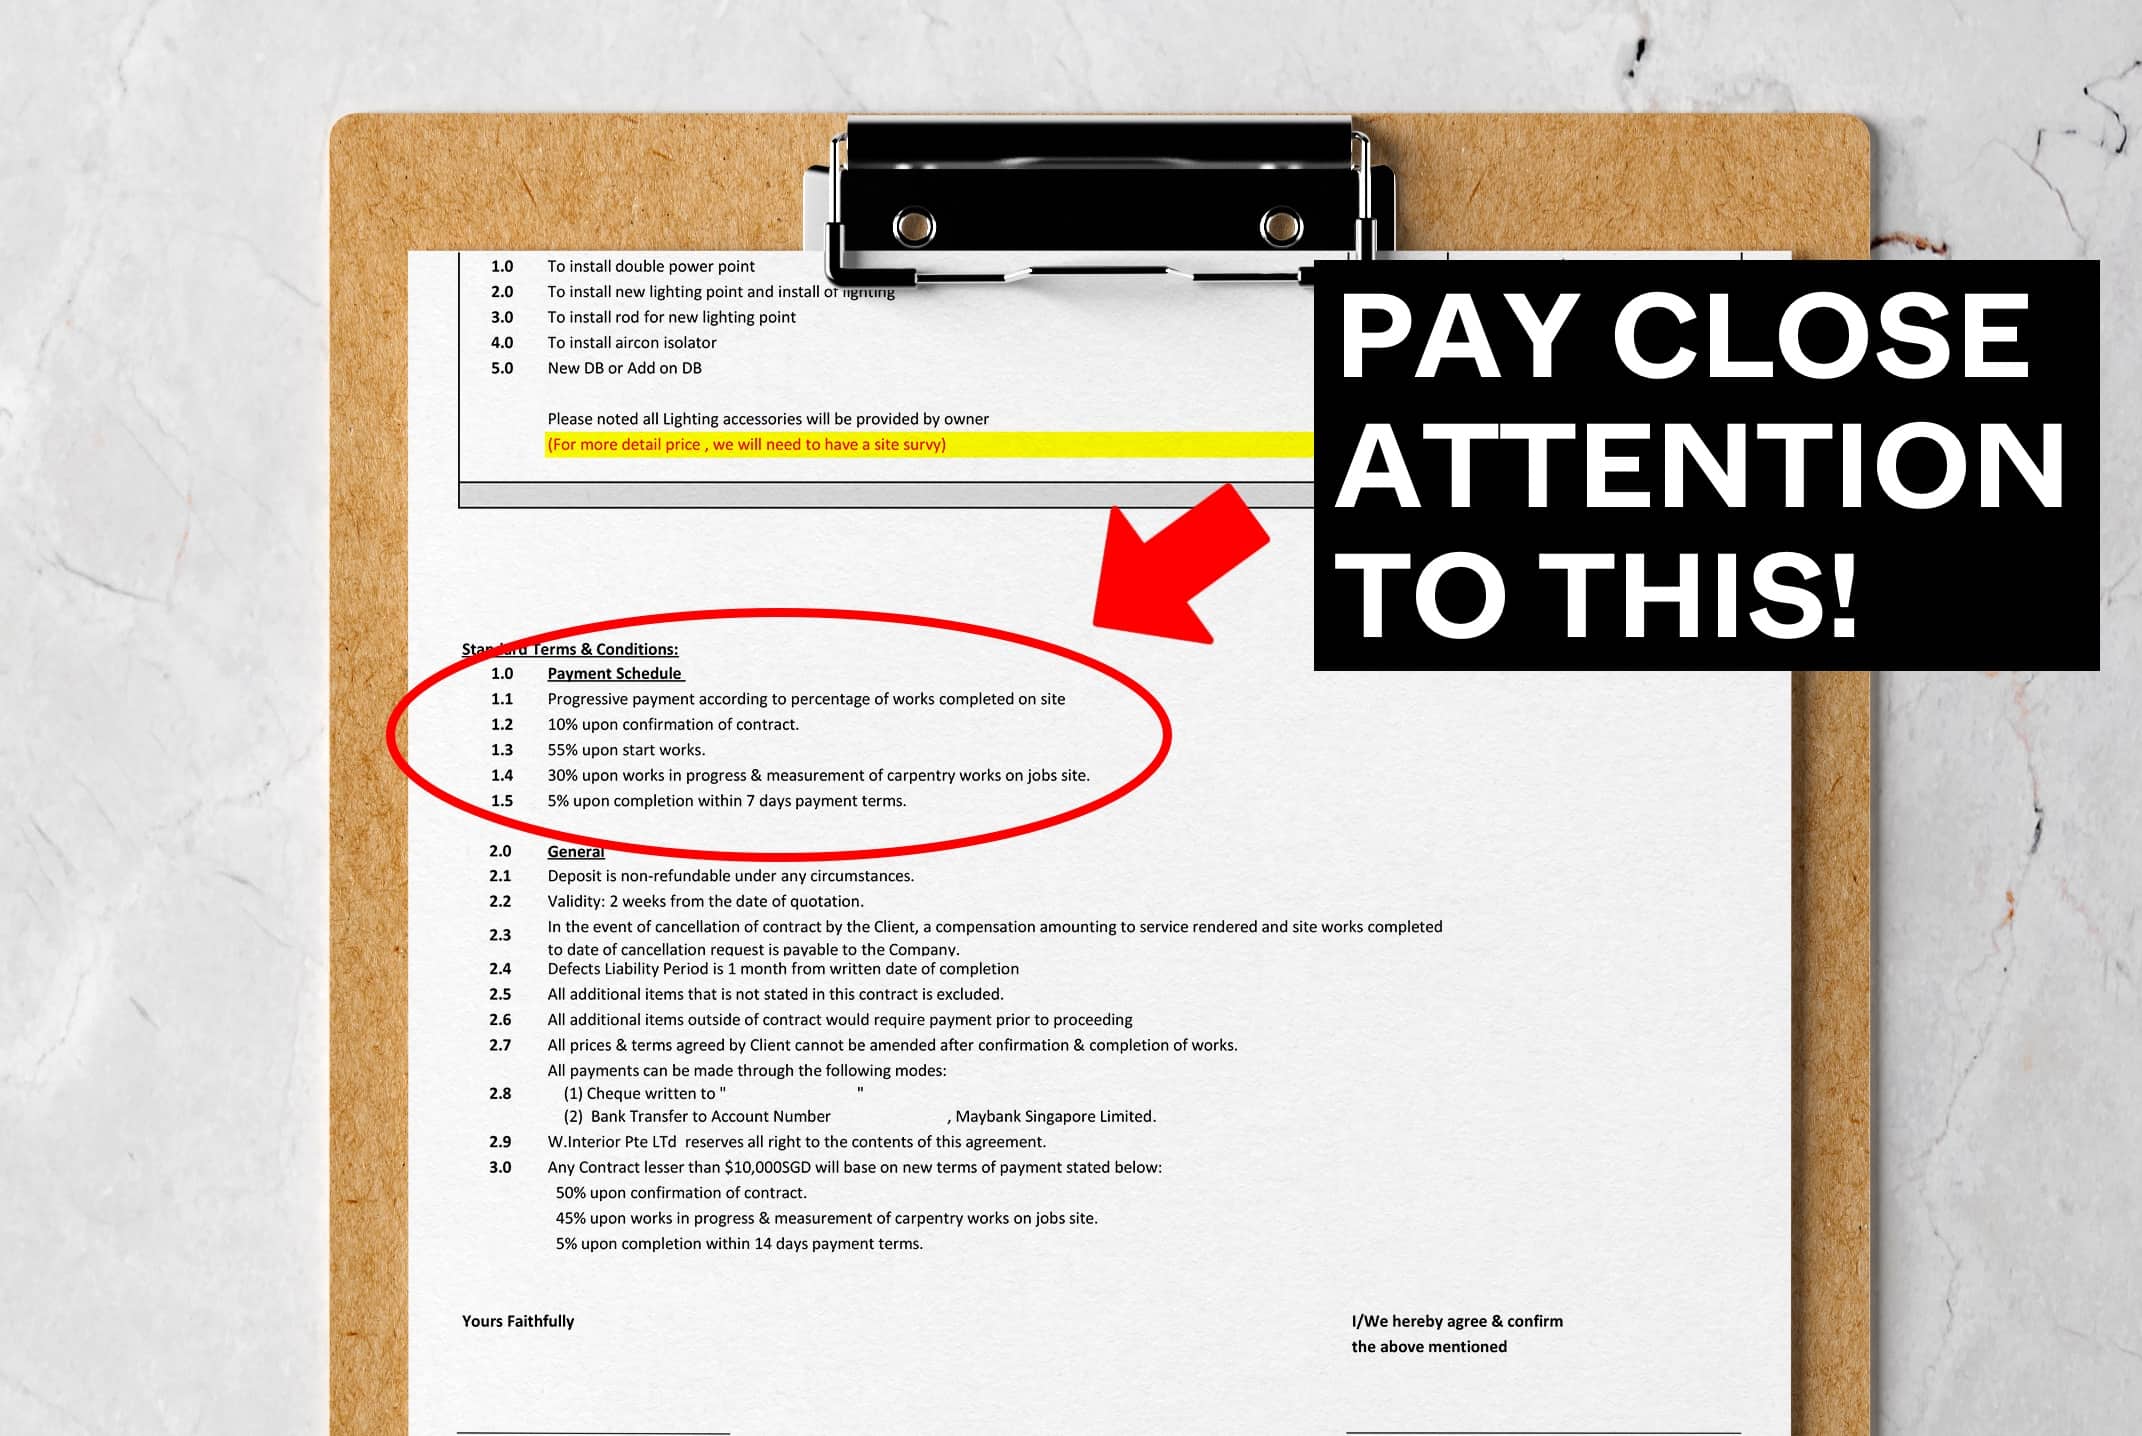
- 1. Minimise upfront payments, and pay based on measurable milestones
- 2. Set realistic dates for completion
- 3. Check that your contractor or interior designer is properly insured
- 4. Don’t assume defects will be resolved before the handover
- 5. Check out clauses for variation
- 6. Ensure there’s written proof of everything
- 7. Look for detail in the scope of works
- 8. Ask about the various warranties
- 9. Accompany your contractor to the tiling supplier
- We can’t stress this enough, but getting a detailed contract done right can save you a lot of headaches later on
1. Minimise upfront payments, and pay based on measurable milestones
It goes without saying: if you pay upfront, you face the risk of unethical contractors/designers running off with your money. You’ll also have a tougher time trying to get the money back, if the work ends up being sub-par.

This is one of the most common issues when you hear of renovation horror stories. The homeowner has already paid a big chunk to start renovation works, and is now held ransom because of that.
Which is why you should always try to minimise your payment upfront, and have a good payment structure that helps to facilitate a win-win working relationship.
One example of this would be payment in tranches, such as 10 per cent once the flooring is done, 40 per cent once the kitchen is done, etc. In essence, you should only be paying for the work as it’s finished.

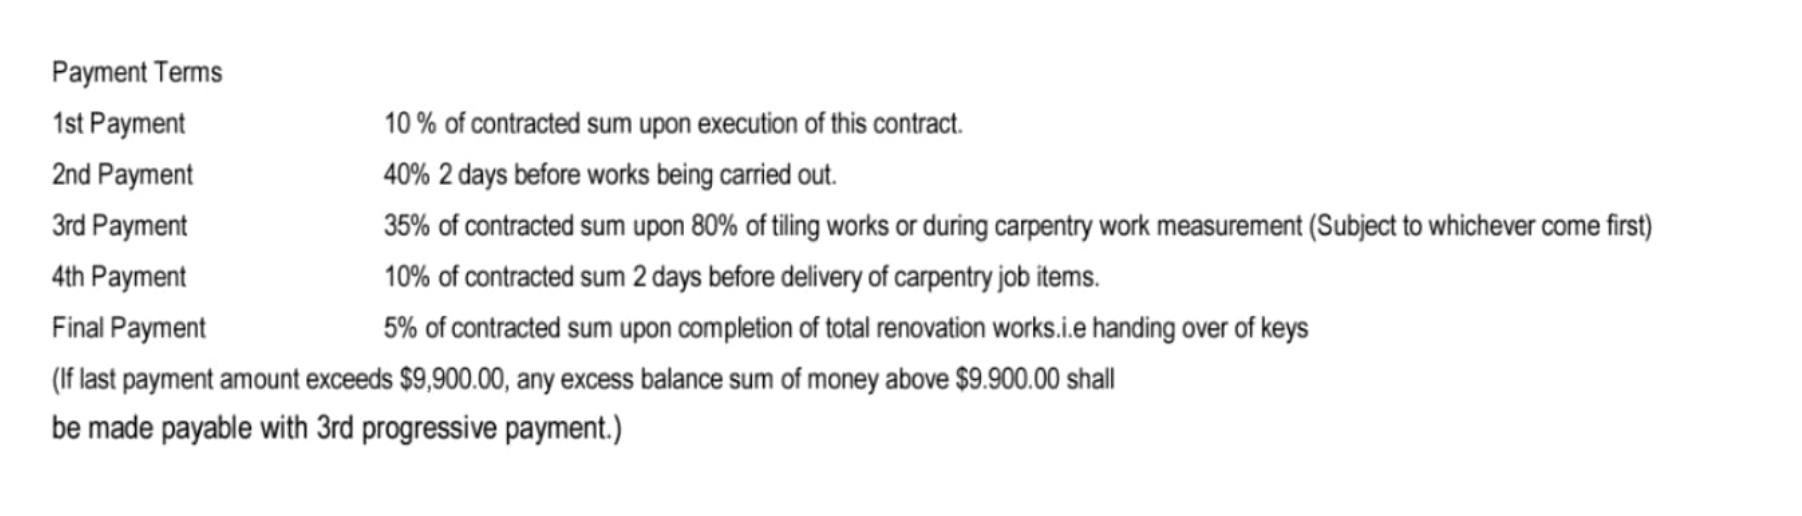
Typically, you should only be paying not more than 20 per cent to start works, any larger than that and you’d really need to question your ID/contractor as to why the need for such a big commitment to start.
You can include a timetable along with these milestones, so the contractor has to meet both the timeline and the necessary standards. Speaking of timelines…
2. Set realistic dates for completion
“As fast as possible” is not always the best idea. Bear in mind that, the shorter the time frame, the more rushed the work will be – and too much haste can result in shoddy workmanship, or lower grade materials (if the first choice of materials takes too long to ship over).
After all, you are going to be living in the home for the next couple of years. And as tempting as it is to be able to move in quickly, it’s better to have a well-constructed home from the beginning, than to deal with renovation issues down the road.
Do get the start and end date from the contractor in writing; but try to work with them rather than just dictate impossible dates. Find out how much time they need to do the work well.

Be wary of companies who promise the shortest possible time frame: they might be companies who do rush jobs (to squeeze in as many clients as possible), or it may just be a sales pitch to get the job (resulting in many unexpected delays later).
On your end, make provisions for your renovation to take one month longer than expected.
3. Check that your contractor or interior designer is properly insured
Home content insurance rarely covers damage caused by renovations. Rather, damages are supposed to claim from your contractor’s insurance.
You can ask for a copy of their insurance, as this usually shows how much they are insured for and the damages amount that they can claim for.
For established companies, being properly insured is almost a given – but beware of working with “unofficial” contractors who supposedly have better rates. If they end up damaging your property (or worse, the neighbour’s property), you could end up paying way more than you expect.

4. Don’t assume defects will be resolved before the handover
It would make sense that all defects are addressed before handover; but some contracts are vague about this.

Some contracts may specify a certain amount of time for defect rectification (e.g., up to 30 days after completion), whilst other contracts may not even bring up the issue. In particular, note that some contracts push the responsibility entirely onto a subcontractor. If there’s a problem with the electrical works, for example, the contract might require you to take it up with the electrician by yourself.
Always ensure the issue of defects is fully addressed, and spelled out to your satisfaction in the contract. Remember, the final payment should only be due after all the defects are rectified.
5. Check out clauses for variation
Variation refers to changes to the initial plan. For example, deciding to add or remove a partition, or change the design of a feature wall. It’s quite likely that, over the course of renovations, you will decide to make at least some changes to the plan – so the contract should spell out the costs involved.
The key issue to look for is forfeiture fees. These are fees your contractor is not obliged to refund, because they may have already ordered the materials or done the work (e.g., if you change the flooring materials after the tiles have been bought, your contractor still needs to pay for the previous batch).
The forfeiture fees can be higher than you expect; and this should have a bearing on your decision to vary design plans. As such, make sure the amounts are spelled out in the contract.
6. Ensure there’s written proof of everything
Never rely on verbal promises or confirmation; these can’t be proven later. Whatever agreement or change your contractor makes absolutely should be in writing. This can include email exchanges, text messages, or actual written documents.

There’s an added advantage to this: when things are spelled out in writing, miscommunications are less likely. You’re better able to catch errors in the list of materials, prices, design, etc. as compared to just listening to someone say it.
Also, remember that sometimes your project manager can just quit halfway due to a variety of unforeseen reasons. If you’ve relied up to that point on future works that have been promised over calls, you will face an uphill battle trying to prove that these were communicated. Get everything in writing.
7. Look for detail in the scope of works
Especially for first-time homeowners who have less knowledge of what usually is included in the scope of work, you’d want this to be as detailed as possible. Never mind if it takes longer to do up, as a vague scope of work is usually what causes friction during the renovation as it will always result in an “oh I thought this was part of it” type of argument.
This can go down into detail such as the dimensions of carpentry, the brands of laminates, choice of materials, and even the type of paint.

As an example of this, Acrylonitrile Butadiene Styrene (ABS) trimming may not be part of the scope, when using laminates (this is the sealant used on some wood surfaces, such as cabinetry). You’ll usually want this for cabinets that see heavy use, so make sure this is specified in the contract.

Likewise, you might want to go into detail on the brand of paint used – Nippon Odourless EasyWash is more expensive than Nippon Vinilex 5000, for instance; but both are interior wall paints. These paints may have different qualities, and use different sealers (e.g., oil-based versus water-based).
These are details you should go into with your contractor, and ensure they’re all down in writing.
8. Ask about the various warranties
What happens if your cabinetry starts to warp after just a year? Or if the tiles used are already starting to fade? Some materials may come with warranties that last a lifetime; others may have no warranty at all. On top of that, you need to know who to contact regarding these warranties, and how.
These are all issues your contractors should walk you through; and they should inform you of the risks, if you choose products with no warranty.
Note that lack of warranty can sometimes be the reason behind unusually cheap materials or products; this can make the ultimate cost quite high, if you need to replace them after short periods.
9. Accompany your contractor to the tiling supplier
Aim to pay the tiling company directly, rather than pay your contractor. This is because some renovation companies will ask for a higher “wastage”.
The wastage refers to extra tiles, on top of the required amount (sometimes the contractor needs more than expected, and it would be time-consuming to make a new order). While the usual wastage is 10 per cent, a contractor may ask for 15 to 20 per cent more than necessary as wastage.

This is because unused tiles can be returned back to the tiling supplier, and the contractor will get a credit note; they can use this to offset the cost of future tile purchases for other projects. However, this comes at an unfair cost to you.
So when you see charges for tiling materials from the contractor, request that they take them out. Ask them to charge you only for labour; you can pay the supplier yourself, when they accompany you to the shop.
So instead of:
“Provide supply and labor for tiling works to floor”
It should be:
“Provide ONLY labour for tiling works to floor. Supply to be provided by Client”
That said, do take note that this will also mean that you will have to take on the responsibility for the coordination with the supplier. If it’s poorly managed and affects the project’s timeline, that will be on you and not the contractor.
We can’t stress this enough, but getting a detailed contract done right can save you a lot of headaches later on
Due to inexperience, many first-time homeowners tend to gloss over contract details, in their hurry to get the renovation started to move in.
One final tip is to think about a liquidated damages clause in your contract. This can state the amount of damages that a party which has breached the contract will have to pay the other party. So if your contractor has breached the contract, you may be able to claim the amount of damages stated in this clause, rather than having to prove and quantify the exact amount of losses first.
For more useful tips on home ownership, follow us on Stacked. We’ll also provide you with insights and reviews on new and resale properties alike, so you can make better-informed decisions.


Construction and renovation work in Singapore is done basically by unskilled foreign workers. As a result, SHODDY WORKMANSHIP is the norm. Renovation contracts therefore only offer partial protection for those using renovation contractors. For tiling work, the problem is not limited to the selection of tiles. The more serious issue is tile installation. Any tile is only as good as its installation. Many of those doing tiling work do not have the proper tools, knowledge, and/or experience. To make matters worse they try to minimize the cement used to fix the tiles. It is easy to check tiling work. Just knock the installed tiles with a blunt/rounded metal object. If it sounds hollow then the tile is not properly fixed. Improperly installed tiles will eventually crack. Replacing them is costly and often difficult, if not impossible because the tile(s) needed are no longer available.
Tuesday 26 July 2022
Many thanks for a well intended cautionary advice, but I can tell you that one can have all the right ingredients as those proposed in your article in place, and yet, ended up in nightmares!
What you suggested will not act as safeguards not prevent nightmares for the house owners because they are not the core/ root cause of renovation woes in Singapore.
I have travelled through the house renovation road before, in similar manner /fashion as what is being prescribed in this article and still hit the wall.
Contract was written out by the contractor himself; inclusive of completion date and its penalties, the warranty… blah…blah and so forth… but the significance was that of a sheep-skin overlying the wolf.
When it came to a crunch, even the lawyer was giving excuses for the contractor, such as, illiteracy, poor financially, etc. despite the fact that the contract was entirely written by the contractor himself, hence, how illiterate can he be?
And when they are unhappy with the Court’s judgement and final payment, they took upon their hands to attack house owner with nuisance calls in weird hours of the night.
In the olden days, before the emergence of ID caller machine, etc, it was a very long and tedious process trace /track down the caller. Only SingTel could find out who the call is. But SingTel required to be contacted immediately after each nuisance call. And only after a certain number of collated calls from the same caller /number, that SingTel would deem it necessary to lodge a police report.
it was another tiresome journey to reach to the Court’s chamber.
Only then that I knew for certain who was it that had been disturbing me night after night at 1, 2, 3am,
However, after all the hard work to arrival at a point of redress for compensation of wrong and grievance suffered, I was disillusioned when all that the judge did was to query the contractor whether it was him who made those calls.
When the answer came back in affirmative… the judge whispered in a hardly audible tone under his breath, “don’t do it again”… that’s all… court session over!
I didn’t even get to utter a single word; nor received any apology, either under the Judge’s directive to the contractor, or from the contractor himself. Where was justice served? In fact, I suspected he felt triumphant!
Another contractor was even more wicked and evil. He scammed with a purported repair of water seepage. When I found out what he did and the material used, I contacted him and repudiated his works. While,he demanded for more payment, I had asked for refund from an overpaid down payment contract.
He or his men came in the still of the night to vandalise my front yard. Yes, came through from the low dividing wall with next-door neighbour. They climbed on the trash bins to get into my neighbour’s front yard, then, easily get into my house through the low diving wall. They broke all my clay figurines together with big pots of plants, and threw them all into the pond!
In Singapore, my humble opinion is that justice does not exist when the owner wishes to seek recourse against menaces by contractors.
Because lawyers and the Courts of law do not truly understand justice; and ironically they are the very ones assigned the power to arbitrate disputes, imagine that?
Just like how that High Court Judge Chan who overturned the lower court’s sentence and acquitted that Indonesian maid, Parti Liyani.
That High Court Judge had committed an enormous stiff wrong and made colossal injurious judgement on all people concerned, namely, the elder Mr Liew, and all the AGC staff… reducing the lower court’s judiciary system a joke, a mockery and a sham /shame to Singapore!!!
In Chinese, there’s a catchphrase that goes like this,搬起石头砸自己的脚 — means picking up a stone to crush on one’s feet … implication is that the High Court Judge had trampled on the ACG personnel and lower Court’s judicial decision in similar fashion like shots on teammates in the activity / field course of taking on illegal poachers of animals!
IMHO, what is lacking or in wanting in the construction arena, eg renovation contractors, in Singapore, is credibility of the moral character of personnel.
The contractor nor his managerial assistance often failed to oversee the works done by the workers!?
So, it is left to the house owner to ensure that works are properly carried out!
Actually, not just them, organizations that deal in sale of goods, even the NTUC FairPrice , etc, are paradoxically not “fair” [how ironic] in their dealings with customers.
Bottomline is that quintessentially, we can safely surmised that the ethical and moral standard of personnel in businesses in Singapore are fallen even below the sub-standard mark!
Wow. Rant has taken a whole new meaning for me.